How To Make Fabric Covered Boxes
Very talented crafter and CIW fan, Linda Kiddell, shared a beautiful craft project she was working on and we all thought it was so cool, we begged her to share how she did it! Linda was kind enough to demonstrate her method for making fabric-covered boxes.
How to make a fabric-covered box step-by-step
Linda’s Instructions:
This will make a box 26x21x8 cm this is going to be a baby keepsake box.
What You’ll Need:
- Book board or mat board
- Glue Sticks and a Glue Gun
- Fabric in coordinating colors
- Embroidery and sewing thread in colors that match the fabric you chose
- A ruler
- Buttons (for the closure)
- A rotary cutting tool or utility knife and self-healing mat
- scissors
- a marking pencil
1. Cut board for the ‘outer’ box

First you will cut your board pieces that will eventually get covered in fabric.
Measure the card and cut to the required size and height. The construction of these is kind of like a box within a box, so you will do this twice. This is the outside section of the box. I don’t make the lid until I have completed the main part of the box to make sure I size it correctly.
2. Cut board for the ‘inner’ box
Now make another box 1/2 cm smaller than outside box. I have chosen to make the inside panel’s 1 cm lower than the outside panel’s. This is purely my choice but I recommend the height of the inside panel be no more than 1/2cm lower. This is so the inner part of lid sits comfortable. (see measurements pictured below.)
3. Cover the outer box pieces with fabric and batting. Fold and glue.

Cover and glue all parts of the outer side of your panels with batting and patterned fabric.
(Linda says: “I have made boxes where I have used batting on all parts of the box but I prefer just the outer panel’s and lid.”)
Take care folding the fabric and gluing. It needs to have neatly folded over corners and edges. To prevent extra glue clumps, only use a small amount of glue on the outer edge of the wrong side of each panel.
4. Cover the inside box pieces with your other fabric the same way as above
5. To finish each panel, glue the unfinished sides of each inside/outside pair together.
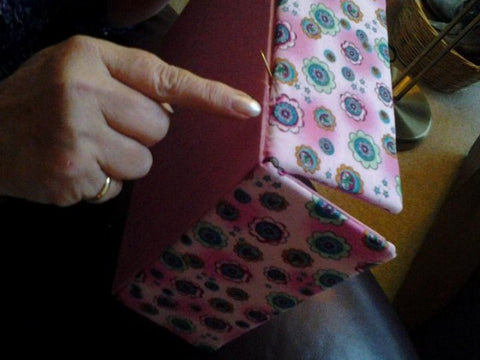
6. Sew the box together.
Hand stitch the side panels to the base and then sew the sides together. You will be sewing on the outside of the box.

Linda stitches them like this.
When stitching the panels to the base of the box, Linda recommends that you try to keep your stitches small and discreet. She also says, “A good match in color for the thread is essential.” (That way the stitches blend in and remain somewhat hidden.)
7. Make The Lid.
Once you have sewn all the side panels together, it is time to make the lid. Measure the length and width of the box bottom, and cut a new piece of book board to that exact dimension.*
Cut another piece that is the same dimensions as the inside of the box
Linda says. “The size of the lid is up to you but I like to make mine with only a slight overhang at the sides and slightly more at the front.”
*Take care when gluing the inner lid to the top and that you position it so when the lid is closed the inner lids sits comfortably inside the box. This will insure the lid closes properly.
8. Sew The Lid To The Base.
When sewing the lid to the base I like to use embroidery thread in a complimentary color. I use three strands for this and prefer a cross stitch as it make the lid more secure and sturdy. For this project I will also cross stitch all the side seams.

This is the box completed. As you can see, I have made a little tag and glued it between the inner and out lid adding a pretty button.
I am looking forward to seeing box’s you create, I hope my instructions are clear and easy to follow, good luck.

Thank you, Linda (pictured above,) for sharing this beautiful project with us! Linda is also very active in local crafting groups – check out some great pictures she has shared of her quilting/crafting group called The Abby Patchers in Minster Village!